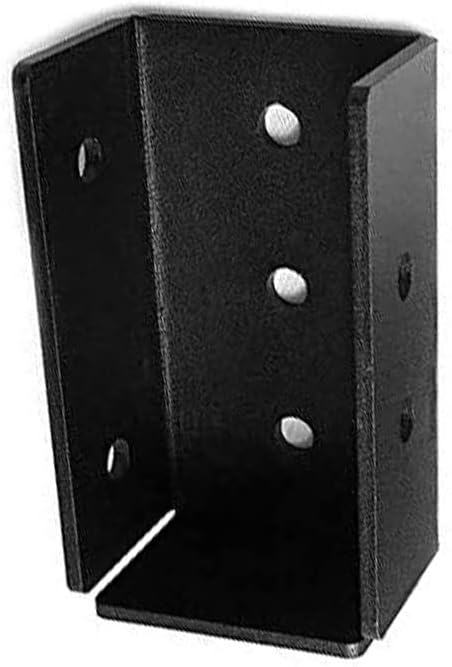
Framola Extra Strong British Made Timber Rafter U Shape Bracket - One Piece Solid Steel Indoor Outdoors Rafter Brackets - Durable and Rustproof - Black (4" x 2")
FREE Shipping
Framola Extra Strong British Made Timber Rafter U Shape Bracket - One Piece Solid Steel Indoor Outdoors Rafter Brackets - Durable and Rustproof - Black (4" x 2")
- Brand: Unbranded

Description
There are many good options to consider when determining how to attach your roof to the walls of the structure you’re building. This side rafter bracket is generally used on properties where there is no fascia board at the eaves (often referred to as open eaves). MegaMaxx UK™ Stainless Steel Square Washers (3 Sizes Available) These stainless steel square washers are perfect for any project. Simpson Strong-Tie also offers another style, which attaches to the front of the top plate and the side of the rafter.
If you are doing 16” OC, then start ¾” in from the front edge of your top plate, where your first rafter is going to sit. Instead of attaching the tie to the rafter, you will be attaching it to the bottom chord of the truss. Top-fix brackets will need to be bent on site to match the pitch of the rafters and allow for the fall along the run (if you are including one). This top rafter bracket is generally used on properties where there is no fascia board at the eaves (often referred to as open eaves). I take the ridge beam and lay it on the top plate of one side of the wall, then mark the edge of the ridge beam just where I’ve marked the top plate.If you do just one side, all the way down, then the ridge board can come loose or be distorted from all the hammering in the same direction.
Building them is easy with the Framola system of Pergola brackets, and Rafter Brackets allow you to build roof structures with ease. Given that this section of the bottom chord is likely where one of the connector plates that hold the truss together is located, you may need to nail through a metal plate on one side of the truss. I hope you were able to get some good information from this article in terms of how to build rafters for a shed and how to install them.
It rests on top of your wall framing and, when done properly, serves to keep your shed walls in place while supporting a roof.
Do not install the ridge board to rafter connectors on the ends of the ridge beam yet – you will do this at the end. Since both rafters are hanging off the edges of your shed, you’ll just outline the corners of the shed onto the 2x4s. Attaching the gussets requires 1 ⅝” wood screws and construction adhesive – I use Gorilla Heavy Duty Construction Adhesive and it works great.
As with the rafter, make sure you drive the screw in at the point where the top plate and wall stud meet. Installation is similar to rafters; only you’re driving the 6” screw through the underside of the top plate into the top and bottom chords of the truss instead of into the rafter.
Framola™ Pergola Internal Corner L-Bracket The Framola system is designed to make the construction and installation of Pergolas and Garden Structures as simple as possible. Our sloping brackets enable you to install rafters at 9 different angles, with options to secure the wood at each end with complementary "Mate" brackets.
Your last rafter won’t be exactly 16” away, so your last two will likely be closer than the others, which is fine. Once your truss is in place, apply angle connectors to both sides of the bottom cord and install using Simpson’s 1/4” x1. Always make sure to have a gutter union/connector (wherever you need to join two gutter lengths, an angle, or prefab outlet) near a bracket to support the joint, especially if you have elected not to use the ‘bead connectors’ which sit inside the front scroll or ‘bead’ of Infinity gutters, angles and pefab outlets – halfway into each across the join – offering additional support. That new vertical and the horizontal line you drew extending toward the inside of your shed are the cuts you’ll make – a triangle.
- Fruugo ID: 258392218-563234582
- EAN: 764486781913
-
Sold by: Fruugo